
Microsoft recently announced the general availability of Microsoft Teams Breakout Rooms! This has been a long-awaited ask from the tech community and has been in the works for quite some time! In today’s blog, we’ll discuss what a breakout room is used for, how to create one, how to assign people to a specific breakout room, and how to start/open and close your Breakout Rooms. In the next blog, we’ll take things a step further by digging into the Breakout Room settings, discussing how to rename your Breakout Rooms, showing you how to interact with all participants of your Breakout Rooms, and even outline some small caveats with Breakout Rooms at this time.
What is a Microsoft Teams Breakout Room?
Simply put, breakout rooms allow you to separate your meeting into sub-groups so you can facilitate individual discussions/sessions. Once those individual sessions are completed everyone can be brought back into the main meeting where everyone can discuss the outcomes of their brainstorming sessions. This can be very useful for teachers who would like to separate the class into several smaller groups to discuss topics or what they learned in the last lesson with a few other students. This can also be used in a corporate setting for projects that have several different moving parts and multiple departments in play. Now that we know what Breakout Rooms are and what they can be used for, let’s talk about how to get a Breakout Room created!
How do I create a Breakout Room?
Breakout Rooms are now built into the meeting controls at the top of your meeting. To start using Breakout Rooms, schedule a meeting, and include all participants that you’d like to be part of your discussions. Once you’ve joined the meeting you should see the option to start a Breakout Room (icon below).

Once you’ve selected the Breakout Room icon you’ll be presented with the Breakout Room settings page where you will specify how many rooms you’ll need (1-50), and also how you would like to assign your participants (automatically or manually).


Once you’ve chosen your room settings and participants, select the Create Rooms option to create your Breakout Room.
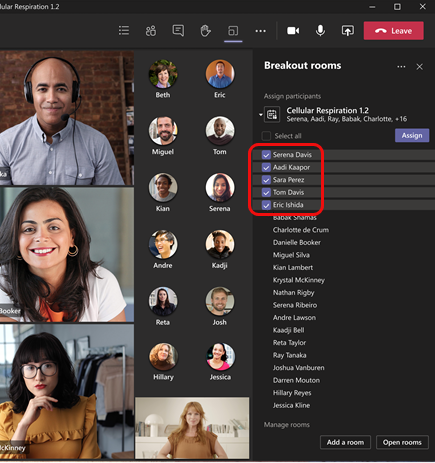
How do I assign specific people to a Breakout Room?
In the example above, when creating the Breakout Room, you had two options on how you’d like to assign your participants: automatically or manually. If you want to assign specific people to a Breakout Room you would choose the Manual option. If chosen, you will see a full list of all meeting participants with a checkbox next to their names. To manually assign users to a Breakout Room simply select the checkbox next to the names of the people you’d like to share a Breakout Room and then select the Assign option. Lastly, select the room you’d like to add those people to and that’s it!
How do I start/open my Breakout Rooms?
Great, you’ve created your breakout room and assigned your participants accordingly! Now it’s time to start/open your Breakout Rooms so they can be used. As soon as you’re ready to start your Breakout Rooms you will see the option to Start Rooms. Selecting this option will start all rooms at the same time. However, if you’d only like to start one room, find the room in your list and select the More Options ( … ) ellipses next to the room and then select Open room.
How do I close my Breakout Rooms?
Just like with starting your Breakout Rooms, you have a couple options in how you’d like to close your Breakout Rooms. If you’d like to close all Breakout Rooms at once you’ll see the option to Close Rooms. However, if you’d like to manually close one room at a time you can do this by selecting the More Options ( … ) ellipses next to the room and then select Close room. Once the rooms have been closed you should see a status next to the room showing Closed. Once you have closed the room, the meeting participants will be returned to the main meeting space. Once everyone is back in the main meeting you will see the option to Resume, select this, and continue your meeting with the larger group.
Note: You can open or close a Breakout Room more than once during a meeting.
Great job! You now know the basics of how to use a Breakout Room! In the next blog, we’ll take things a step further by showing you how to interact with your participants of the Breakout Rooms, showing you the different room settings, and even discussing some small caveats present in Breakout Rooms at this time! I hope you have found this article helpful and hope you have a wonderful 2021!