
Understanding and correctly executing a Git workflow strategy is critical to the success of a development team. Git workflows like Gitflow and GitHub Flow are popular and fairly easy to grasp for development teams of all skill levels and project needs.
The Sitecore team at Perficient has started to use the excellent Git DMZ Flow Git workflow for our projects, and while it holds a lot of promise and power, it does require a fundamental understanding of Git concepts.
Git DMZ Flow is quite unique and perhaps a little challenging for Git newcomers to understand. In fact, even decent developers may struggle with the forking and merging concepts of Git DMZ Flow, and documentation on day-to-day usage for developers is thin. Let’s fix that.
Developers unfamiliar with Git DMZ Flow can use this guide to get started and understand the basic workflow of forking, branching, and submitting PRs.
What is Git DMZ Flow?
Daniel Spiewak first described DMZ Flow in 2015, and this remains the best overview of the workflow.
While Daniel does a great job of covering key aspects of the workflow, it’s a lot to take in at once. Here’s a tl;dr version that’s relevant for developers new to it.
Git DMZ Flow:
- has a main repo with two key branches:
masteranddmz - scales to any size team with virtually no process changes
- uses forks instead of branches to manage code workstreams
- always has a clean
masterbranch in the main repomasteris always deployable and branchable
- only the
dmzbranch in the main repo accepts pull requests from other forks- only PR code changes are visible to the main repo via the
dmzbranch
- only PR code changes are visible to the main repo via the
DMZ Flow reinforces proper usage of Git concepts such as forking, merging, rebasing, pull requests, and proper management of remotes. Because each developer maintains their own fork of the main repo, each developer can run amok in their fork without interfering or cluttering up the main repository.
Note: I call the original repo “main” throughout this guide, but upstream is also a good name and perhaps more obvious to some developers.
A DMZ Flow Overview
The best way to understand DMZ Flow is to visualize its overall structure. Developers will generally follow this workflow between the main repo and their local fork:
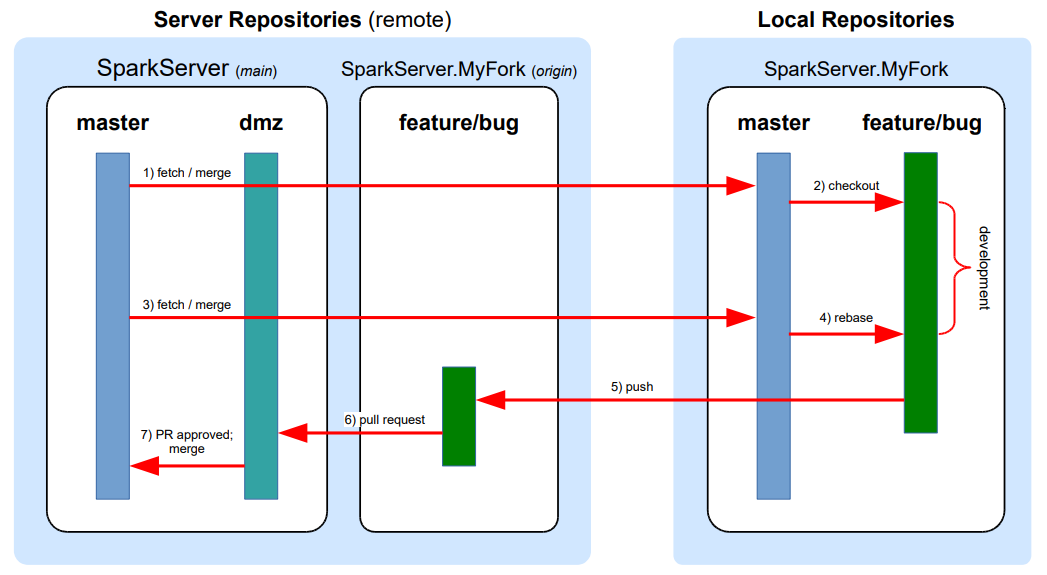
Using Git DMZ Flow
For developers new to DMZ Flow, this is a step-by-step guide to using it as your daily Git workflow. This assumes that the existing repository already uses DMZ Flow and associated build processes.
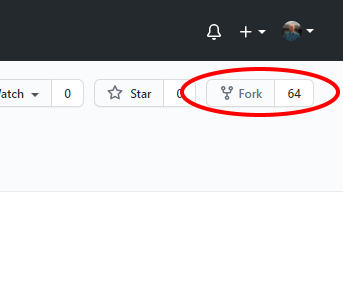
1) Create Fork and Clone Repo
First, create a new fork of the repo. Azure DevOps and GitHub both make this really easy.
AzDO:
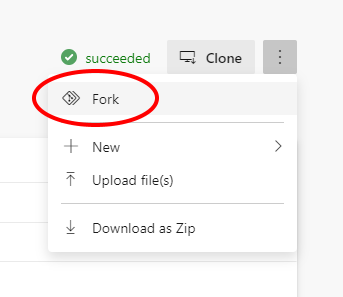

GitHub:
Second, clone your remote fork to your local machine:
$ git clone https://github.com/bmbruno/SparkServer.MyFork.git
2) Manage Your Remotes
Developers will have two situations that will require them to carefully manage remotes:
- pulling in other developers’ work for integration or testing
- pushing code to their remote fork to start pull requests
Each developer should ensure they have remotes set up for their fork and the main repo. To do this, add the main as a remote:
$ git remote add main https://github.com/bmbruno/SparkServer.git
You can name it whatever you want, but main or upstream are fairly common.
Verify that you have both remotes set up:
$ git remote -v
Output:
origin     https://github.com/bmbruno/SparkServer.MyFork.git (fetch)
origin     https://github.com/bmbruno/SparkServer.MyFork.git (push)
main       https://github.com/bmbruno/SparkServer.git (fetch)
main       https://github.com/bmbruno/SparkServer.git (push)
3) Keep Your master Branch In Sync
Because developers manage their own fork, they can choose to keep their own master branch in sync with the main master at any point. It is recommended to do this during a few key points in the workflow:
- before creating any branches
- right before creating a PR
In either case, always fast-forward your sync to ensure a new merge commit isn’t created and the history remains clean.
To fetch and merge into your master branch:
(master)
$ git fetch main
$ git merge main/master --ff-only
4) Branch and Develop
Now you’re ready to begin work on a feature or bug. Developers should create branches based on their updated master branch:
(master)
$ git checkout -b feature/work-to-do
At this point developers can work on their feature, pull in other remote branches to get others’ work, create more branches as needed – whatever is necessary to complete the task at hand.
5) Create a Pull Request
Once a developer is ready to submit their work back to the main repo, it is time to start the pull request process.
Merge conflicts should be fixed in the developer’s fork (again, this is only visible to the developer at this point, so no one else has to see the mess).
First, pull the latest master from main into the forked master branch:
(master)
$ git fetch main
$ git merge main/master --ff-only
(And for those keeping score, yes, you can do a git pull main master --ff-only to get the same result.)
Now that the fork master is updated with the latest main master, it’s time to bring that code into the feature branch. Rebasing works best here: we want to bring the complete and updated history of master into the feature branch as if we just branched from this point in master‘s history.
Ensure your current working branch is the feature branch (git checkout feature/work-to-do if necessary). To rebase onto your feature branch from the local master branch:
(feature/work-to-do)
$ git rebase master
Fix any merge conflicts that arise.
Finally, push your feature branch to your ‘origin’ remote to make it available on the server.
(feature/work-to-do)
$ git push
If you haven’t pushed the branch before, you may have to identify the remote:
(feature/work-to-do)
$ git push --set-upstream origin feature/work-to-do
That’s it! Now you can create a pull request that should target the dmz branch of the main repository. With proper automation, the PR will complete after review and dmz will be automatically merged into main master.