
Introduction:
Recently I have faced an issue in my project on using the multipart and JSON simultaneously. I would like to share my knowledge on how this issue can be fixed.
For this scenario, I have taken a sample Spring-Boot application that uses JSON/ POJO and Multipart. Below are the steps to achieve passing the multiple files using POJO at a same time
Swagger-UI (2.9.2) doesn’t support the list of multipart file API. So, I used Postman. Let’s go for it.
Step 1: Create a simple Spring-Boot application.
Create a Spring or Spring-Boot application in eclipse IDE. Alternatively, we can download it from Spring.io on website.
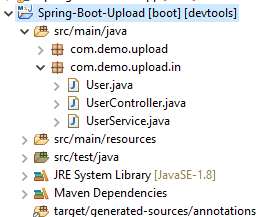
Project Structure:
Step 2: Create one Controller, Model and Service.
Now, I’m taking the user details and a user can upload list of files simultaneously. File details are not required to be added in the User POJO class.
User:
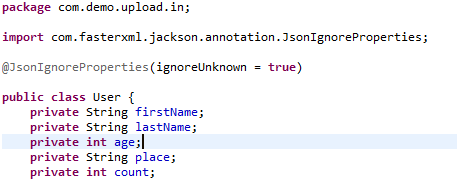 Created getters and setters for the POJO class.
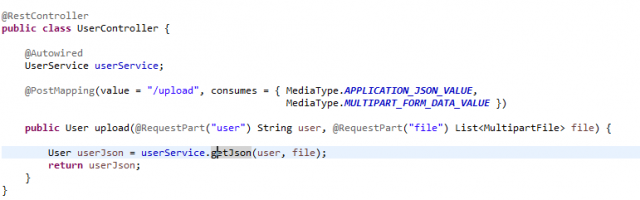
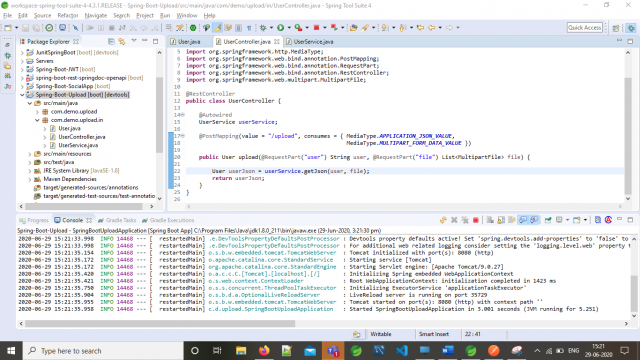
Step 3: Use Multipart in Controller.
As we all know, Controller defines our action and when we want to create certain API and get a response through the API.

To pass the Json and Multipart in the POST method we need to mention our content type in the consume part.
consumes = { MediaType.APPLICATION_JSON_VALUE,MediaType.MULTIPART_FORM_DATA_VALUE })
And we need to pass the given parameter as User and Multipart file. Here, make sure we can pass only String + file not POJO + file.
@RequestPart(“user”) String user, @RequestPart(“file”) List<MultipartFile> file
Then convert the String to Json using ObjectMapper in Service layer.
UserController:
 Step 4: Change the POJO to String.
Usually we add @RequestBody and mention the Class name for creating a data using POST method. But here, we should add both Json and multipart both. So, annotation should be altered.
@RequestPart(“user”) instead of @RequestBody(“user”)
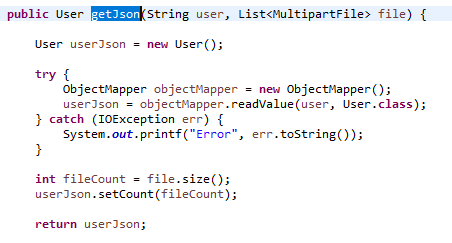
Step 5: Invoke the String to Json.
Convert the String to Json using ObjectMapper. Call it from controller to Service as below :
User userJson = userService.getJson(user, file);
UserService:
 Step 6: Testing with our API.
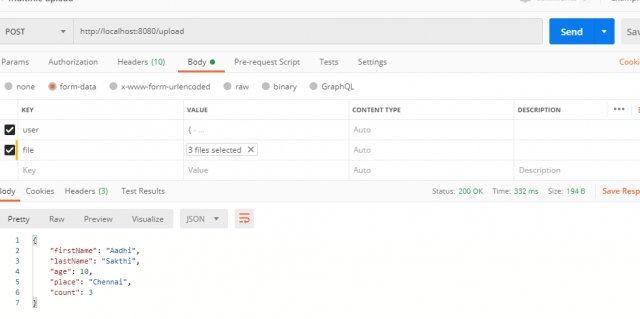
Step 7: Upload the Multipart file and POJO in Postman.
Now, Test the response using Postman by adding the body parameters and values as below.
Endpoint: Post – http://localhost:8080/upload

Sample Request:
{
“firstName”: “Aadhi”,
“lastName” :”Sakthi”,
“age”: 10,
“place”: “Chennai”
}
Now let us attach the sample file which we need to pass in the request.
Response:
 Looks like all done and dusted…!!!
You may get the source code from here: PraseelaRadhakrishnan/Spring-Boot/Spring-Boot-Upload
Conclusion:
Hopefully this documentation will be useful for you.
Very useful, thank you!
Thank you!
It was very useful. Thank you Praseela !!
Thank you it was very useful!
Very Useful. Thanks
Thank you so much, useful and straight forward !
Thank you..!!
This is very useful. Thank you Praseela.
Thank you! Saved lot of time thanks to this!
Thanks a ton. This is what I was searching for.
Very Useful, thank you!
Thank you Praseela! Nothing else I tried worked, but this did!
It has save the day. Thanks !
Thank’s Praseela !!
Awesome stuff! Never knew about this option! Been doing backends for so long, but never encountered this before.
Can you please also write java rest client class to invoke the /upload endpoint , similar to postman ..Rather then postman we wanted to form a client request and call using RestTemplate or rest client . IT will be helpful .
Thank you very much! This is the only correct answer after many hours of research!
Thank you Praseela! Nothing else I tried worked, but this did!
Thanks man, You solved my problem
Hello.
Why you used @RequestPart(“user”) String user instead of @RequestPart(“user”) User user ?
How can I read only the Json file if I get the input from UI and send the response to UI ?
This was very helpful. Thanks a lot
can you please show how we can implement the above thing using react js.
In Localhost works, but when I up in the server returns 415Unsupported Media Type. Somebody can help me?
Hi,
I faced the same issue and solved it but adding a custom HttpMessageConverter
So if I translate for your example :
@Configuration
@EnableWebMvc
public class MyApiConfig implements WebMvcConfigurer {
@Override
public void extendMessageConverters(List<HttpMessageConverter> messageConverters) {
messageConverters.add(new UserHttpMessageConverter());
}
}
public class UserConverter extends MappingJackson2HttpMessageConverter {
@Override
public boolean canRead(Type type, Class contextClass, MediaType mediaType) {
return type.getTypeName().equals(User.class.getName());
}
}
And then in your controller you can retrieve directly the user : @RequestPart(required = true, name = “user”) User user.
It does the same thing but I find this solution more generic.
Thank you