
Large or small, all companies need web security. And what better way to secure your ASP.NET Core Web API than using Azure Active Directory?
Given MVC-style apps are the dominant force in the market nowadays, the majority of documentation on the matter focuses here. That left me, desiring to create a loosely-coupled Web API instead of an MVC app, scouring Microsoft documentation, Stack Overflow questions, and GitHub examples to find answers.
Now that I have successfully completed the task, I would like to share the solution to all of you on a similar quest. I hope my guide helps speed up the process (and lets you look good in front of the boss).
Technologies Used
- Azure organization account
- JavaScript
- ASP.NET Core
- NPM or Yarn
- Adal.js
Prerequisites
- Install the languages listed above (besides Adal.js, we’ll do that later) and your choice of a package manager (NPM or Yarn- I use Yarn).
- Make sure you have an Azure account linked with an organization
- I will be using Visual Studio (for the API) and Visual Studio Code (for the client) – I recommend you use these as well.
Steps
If you just want to skip to the code, check out the sample project I created.
Create Web API structure
We will start with the API. This will all be done in Visual Studio.
- Create the Project
- Select File > Create New Project
- Choose ASP.NET Core Web Application
- Name your project and click “Create”
- Select “API”
- On the right-hand side under “Authentication” it says “No Authentication.” Click the option under this that says “Change”
- A window will pop up
- Select “Work or School Accounts”
- In “Domain” – this may be filled in with your organization’s address already. If not, fill it in with your organization’s “onmicrosoft” address (e.g. perficient.onmicrosoft.com)
- Configuration
- Open appsettings.json
- You will see a JSON object titled “AzureAd.” Replace it with the structure below- using the pre-existing Domain, TenantId, and ClientId values. If these do not exist, you can get them from your API’s App Registry. Leave Audience and Issuer blank for now.
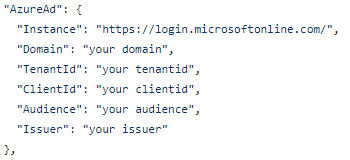
Example
- You will see a JSON object titled “AzureAd.” Replace it with the structure below- using the pre-existing Domain, TenantId, and ClientId values. If these do not exist, you can get them from your API’s App Registry. Leave Audience and Issuer blank for now.
- [Optional] Endpoint Testing
- Run your API using IIS Express
- Notice how the webpage at localhost:[your_port]/api/values gives a 401 error. This is because in Controller > ValuesController.cs, the “[Authorize]” attribute covers the entire class. This means that each endpoint defined here needs proper authorization to be accessed. If you remove the attribute and try again, the data will appear.
- Open appsettings.json
Secure using JWT and Azure AD
- JWT Setup
- Open Startup.cs
- In ConfigureServices(), you add this to your code:
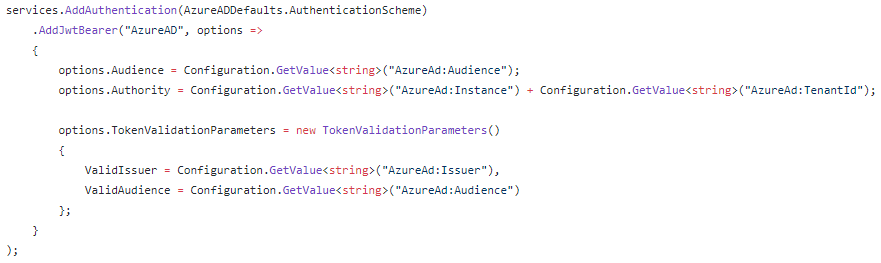
Example
- Secure your Endpoints
- Navigate to one of your controllers
- To require authorization to access your endpoints, we will use the “[Authorize]” attribute. To secure all endpoints in the file, place the attribute above the class declaration. To secure a single endpoint, place the attribute only above the method.
- Your turn
- Now it is your turn. Add your controllers, models, database access, and whatever else you need to complete your API. We will revisit this code at the end to fill in the empty values in appsettings.json.
Set up client structure
- Package Setup
- Create your project structure.
- I will be using Yarn for this example, but NPM has very similar commands (Yarn is built on NPM)
- Initialize Yarn inside your client’s parent folder using $ yarn init
- We will be using two packages- Adal.js and http-server. Install these:
- $ yarn add http-server
- $ yarn add adal-angular
(Don’t worry about the angular part, this is used for vanilla JS as well)
- Your turn
- Now it is your turn to set up your client-side code (if you haven’t done so already). Feel free to write your CRUD requests already, we will only need to add one line to each of them after our next step.
Integrate Adal.js
- Login Setup
- Create a JavaScript file- this will be used as your login controller
- Add the following code:
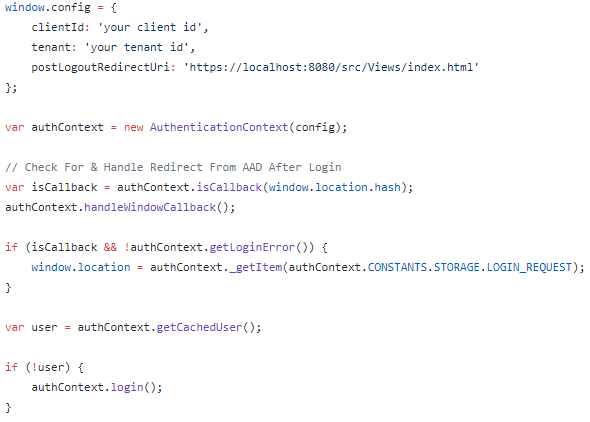
Example
When run, this will setup and redirect you to the Microsoft login page.
-
- Now navigate to the Azure Portal and open your Client’s App Registration. Fill in the ClientId with your Application / Client ID. Fill in the Tenant with your Directory / Tenant ID.
- Don’t forget to add this script to your login page (before your other scripts)! It will run automatically on navigation to the page.
- You can call logout however you like, but it will not run on its own. After logging out, the page will (eventually) redirect to the page you specify in the window.config setting “postLogoutRedirectUri”
- Bearer Token Retrieval
- In the JavaScript file that contains your API requests, add the following code:
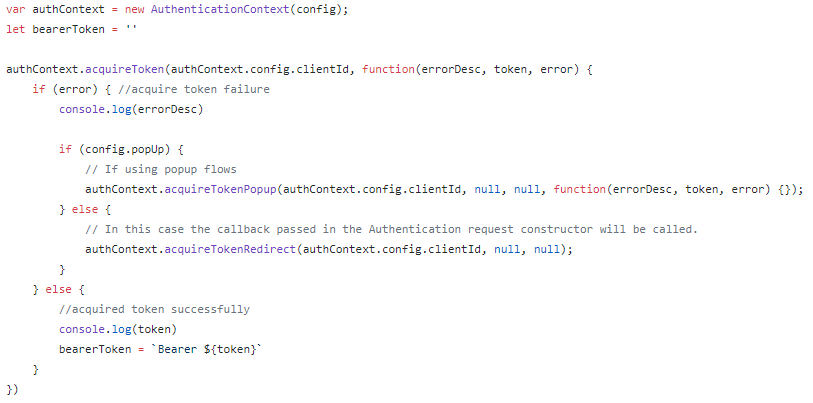
Example - The “token” variable stores the bearer token we will use in our request. If you are using XMLHttpRequest to make the request, you can add the token to the request header using: setRequestHeader(“Authorization”, `Bearer ${token}`)
- In the JavaScript file that contains your API requests, add the following code:
Set up SSL
- Set up OpenSSL on your machine
- Run the following command to generate your key and certificate (you may need to run your terminal as admin)
$ openssl req -newkey rsa:2048 -new -nodes -x509 -days 3650 -keyout key.pem -out cert.pem - Place key.pem and cert.pem in your client folder
- Now, when you go to run http-server, using the following flags:
$ http-server -S -C cert.pem –o - With your project running, copy the token we printed earlier from the console and save it for this coming step.
Azure App Registration
- Go to the Azure Portal and login using your organization’s domain
- Select “Azure Active Directory” and then “App Registrations” (on the left)
- You should see your API app already registered. If not, repeat the next step for your API app.
- Register your Client App
- Click “New Registration”
- Enter your chosen name (this can be changed later) and click “Register”
- API Settings
- Select your API app
- Authentication
- Select the “Authentication” tab
- Check the boxes “Access tokens” and “ID tokens”
- Save
- Manifest
- Select the “Manifest” tab
- Find “oauth2AllowIdTokenImplicitFlow” and “oauth2AllowImplicitFlow” – set these both to true
- Save
- Client Settings
- Select your client app
- Authentication
- Select the “Authentication” tab
- For your redirect URI, enter the page where you will be signing in
- This is found by looking at which page you are on when your Adal.js code calls login()
- If you get an error on the Microsoft login stating the reply URL doesn’t match what’s expected, decode the URL of that page. It should have the correct reply URL.
- For your logout URL, enter whichever page you would like to be redirected to after logout
- Save
- API permissions
- Select the “API Permissions” tab
- Click “Add a permission”
- Select the “My APIs” tab from the window that pops out
- Select your API app
- Click on “Delegated permissions” and “user_impersonation”
- Manifest
- Select the “Manifest” tab
- Find “oauth2AllowIdTokenImplicitFlow” and “oauth2AllowImplicitFlow” – set these both to true
- Save
- Updating the API configurations
- Open appsettings.json
- For TenantId, enter the Directory / Tenant Id from your API’s Azure App Registrations Overview
- For ClientID, enter the Application / Client Id from the same page
- Grab the bearer token that we saved earlier and paste this into the form at jwt.io.
- For Audience, Enter the value found under “aud” here.
- For Issuer, grab the base URL from “iss” (e.g. https://sts.windows.net/)
- [Optional] Open Properties > launchSettings.json
- Change the “launchUrl” values to be the endpoint data you want to see when launching IIS Express
- Open appsettings.json
Now you should be finished! Startup IIS Express and http-server (using the command from above to add SSL) and test it out. If you have any comments or concerns about my code or the steps to reproduce it, feel free to email me at josh.kostal@perficient.com